TIPS ON WATCH PHOTOGRAPHY
FOREWORD
The world of digital photography moves so fast that any page such as this one is doomed to being outdated almost as soon as it is published. Every six months or so new technologies emerge and prices fall in relative terms, to the extent that today (June 2011) even cheap entry-level digicams have 10 megapixel sensors, 4-5 x zoom lenses and HD video capability. I've gradually upgraded my own equipment so that I now own a pretty high spec dSLR plus various lenses, including a macro lens for closeups. However, for web photography all this sophistication is not necessary, and so I'm leaving this page up for interest and nostalgia's sake.* * * * * * * * * * * * * * * * *
This page is in response to many requests (well, one) for tips on how to take decent photographs of watches suitable for posting on the web. I do not hold myself out to be a photographic expert, but if you follow these simple tips you'll be pleasantly surprised with what you can achieve.
Use a digital camera
There are several very good reasons why it pays to get a digital camera for web photography.- It is difficult to get good close-up shots with 35mm and other film formats unless you have macro lenses or close-up rings and a good lighting setup. How many Ebay shots have you seen where the watch for sale is tiny blurry blob on the carpet, because the seller's camera won't focus any closer? Also, to get adequate lighting often a ring flash is required, and flash is not good for watch photography because of the reflections from glass and polished metal surfaces.
- With digital there's no waiting for processing and printing to see if you've got a good result. And if it's no good, you can delete it immediately and take another one.
- A digital image can easily be manipulated on your computer to adjust for too much/too little exposure, colour balance, slightly fuzzy focus, special effects, etc. Try doing that with 35mm prints (although you can manipulate a scanned image to a certain extent).
- Digital cameras usually have very good macro focussing abilities (i.e. they can get r-e-a-l close and still produce sharp pictures). This is important for capturing detail on very small objects such as watch movements.
OK, I need a digital camera. Which should I get?
To take decent photos you don't have to get top-of-the-range equipment. When I first started posting pics on the web, a good camera had 1-Megapixel (1 million pixels) resolution, and one to lust over had 2.3 Megapixels. Today, cameras with 5 and 6 Megapixels are on the market. They take brilliantly-detailed photos which are great for blowing up to A3 size prints, and although costs are continually coming down, they're still expensive. You don't need them for web photos.I still take very acceptable photos with an ageing 1-Megapixel Sony Mavica FD-83 (but see ** below). Its great strength is its ability to focus down to 1cm. It uses floppy disks to store the photos. This is both good and bad, because you can only get about 6 or 7 high-resolution shots on a disk, but on the other hand disks are cheap and you can whack the disk into any computer and download the stored images (in jpeg format). Looking at the market today, I'd go for a camera with:
- 2 to 4 Megapixel resolution
- good macro ability (say, to 10cm or closer)
- 3x optical zoom (for general photos). Digital zoom just enlarges pixels and makes the picture 'blocky', so it's really a waste of time
- a variety of power sources. Rechargeable NiMH (nickel metal hydride) batteries are a good choice, with non-rechargeable lithium as emergency backup.
Most cameras come with too little memory as standard (8-16MB), but extra cards/sticks are available and prices are reasonable (although cards are cheaper than sticks). Get at least 32MB and preferably 64MB or more. 4 megapixel cameras produce large file sizes so a 128MB card is useful. Another useful extra is a card reader. This plugs into any computer with a USB port and acts like an external drive. You slide the memory card into the reader and can then download files without the need for special software.
There are various other bells and whistles you may fancy such as ability to take snatches of video (with or without sound), continuous shooting, higher resolution, etc., but you have to ask yourself, "Do I really need this for what I want to do with this camera?" If the answer is no, why pay the extra?
Above all, good quality optics are required for sharp photos. Nikon, Canon, Sony, Fuji and Olympus all have a good reputation in this regard.
** I've just upgraded to a 2 megapixel Nikon Coolpix 2100. It was being offered by a local camera store at a price too good to miss. So far I've been delighted with the results, and can even print shots at A3 size with acceptable quality.
I've got my camera. Now what?
Just as the three most important factors in buying a house are location, location, location, the three most important factors in watch photography are lighting, lighting, lighting. You simply can't get enough of it. The more light you have, the greater the depth of field possible. By this I mean how much of the picture is sharp. Unless you're going for a certain effect, it's best to have the whole picture in focus, and this requires a lot of light.- Sunlight gives you the most light. It's cheap and abundant but it can be problematical in that you can't control its direction or the amount of shadow casting, and it can also produce unwanted glare. It can also be unpredictable in some climates and at certain times of year, and it doesn't work at night! However for a quick snap, indirect sunlight can be fine. For more controllable results, moveable artificial light in a studio or bench top environment is better.
- The brightest artificial light comes from halogen lamps. A couple of these arranged either side of the watch with some thin white translucent material (paper or cotton) placed as a diffuser between the light and the watch can produce very satisfactory results. (Just be careful the diffusers don't catch fire—those bulbs get very hot!). If you can't get a halogen light source, ordinary incandescent or even a fluoro desklamp will do. Some of my best pics have been taken with a mixture of light from a 100w incandescent table lamp and a 15w fluoro desk lamp. More light would have given me a greater depth of field, but for what I wanted it was OK.
- Don't be afraid to experiment with different set-ups; with digital it's easy to see the results and correct accordingly. Try sheets of white cardboard as reflectors to illuminate the front and far side of the subject. Be creative and use interesting backgrounds such as old documents, maps or planes, but be sure the background doesn't dominate. Highly reflective hard surfaces such as glass or marble-topped tables can give interesting mirror effects. Drops of water on (water resistant!) watches always looks good.
- Make sure you clean every smear and speck of dust off the watch first—it's amazing how a microscopic speck of white nothingness turns into a boulder on large photos.
- Whatever you do, don't use the camera's inbuilt flash for close-up shots—it will always overexpose the subject and wash out the detail.
- If possible, set the camera on a tripod or hard surface and use the inbuilt delay timer to release the shutter. You'll be amazed how much crisper your shots are.
- Most cameras have the ability to lock the auto-focus when the shutter release button is pressed half-way. This feature can be used to ensure all the watch is in focus.
1. Centre on the portion of watch closest to you, press the shutter release half-way and keep it there, thus locking the focus.
2. Move the camera to take in the whole watch, then press the button all the way down to take the picture.
I've taken some photos—now what?
Hopefully, you've used the macro facility and not the zoom, and you've taken the photos at the highest possible resolution to preserve detail when you resize your shots. Why resize? Because at the highest possible resolution your photos will be enormous on the screen. You know how you've had to wait ages on a dial-up connection for some huge photo to download? And when it does download, it pushes everything else to the right and you have to use the horizontal scroll bar to see the text? Don't let it be you who does this to fellow watch fanciers.The most popular resolutions are 800 x 600 pixels (for a 15" monitor), and 1024 x 768 pixels (for a 17" monitor), so you have to bear this in mind when resizing. Somewhere between 500 to 600 pixels wide is a good place to start. You'll probably also need to correct the exposure and increase the sharpness. Some cameras have inbuilt facilities for this, others come with basic software. There are many graphics programs which will do this for you, including of course Adobe's Photoshop and JASC's Paint Shop Pro. These are very full-featured and complex programs, and also cost a bit. Thankfully, there are simpler alternatives. One of the best I've found is Irfanview, available free for private use from www.irfanview.com . This program not only contains viewers to open almost any graphics file you can think of, it also has comprehensive manipulation functions. You can resize to your heart's content. Use the Gamma Correction feature to lighten/darken and retain colour balance. Crop out unwanted material to concentrate the eye on the watch. Use jpeg compression to reduce file size for quicker downloading (25% compression—i.e. biased towards quality rather than small file size—is a good compromise). You can even add text to your photos. It's very quick and easy. It has a good help file too (always a blessing!).
One of the best features of Irfanview is its ability to resize photos to thumbnails, and yet still retain detail. Thumbnails are handy to keep down the size and hence download time of webpages. Just link the thumbnails to the large size photo for those who want to see it full size (see example below).
Some examples
The following are some examples of what inexpensive equipment and image manipulation can do.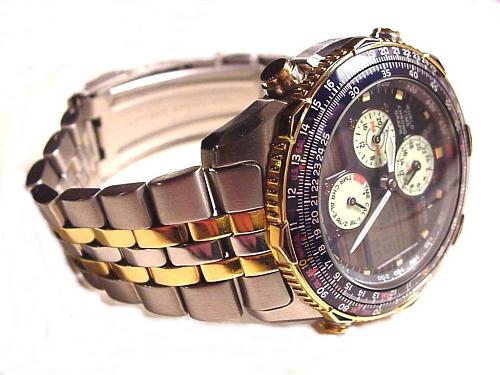
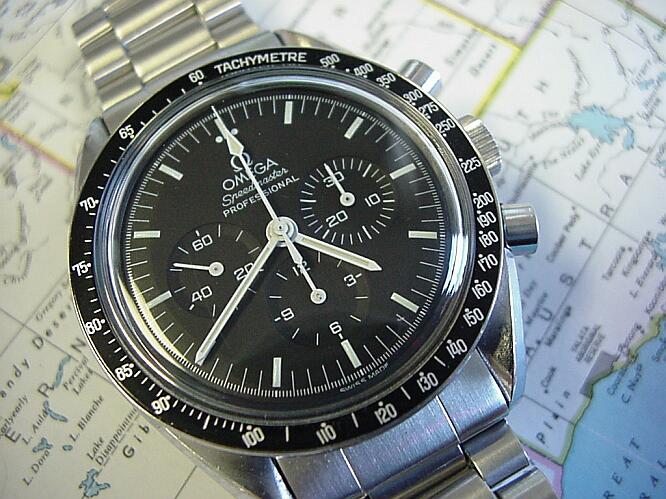
1 mpix, incandescent/fluorescent light, cropped, air-brushed, resized, sharpened, resolution set at 72 dpi. Resultant file size = 33.4kb
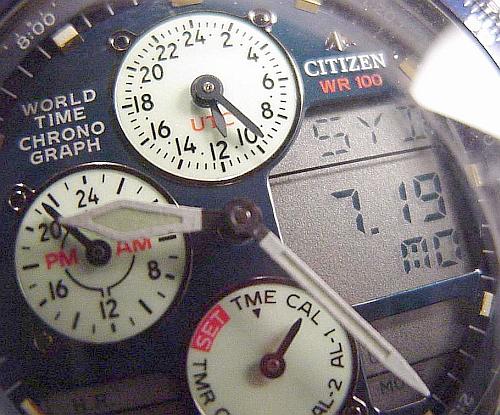
1 mpix, incandescent/fluorescent light, cropped, resized, sharpened, lightened, 72 dpi, file size = 91.4kb. Note how critical the focus is at such small distances.
2 mpix, evening sunlight, cropped, resized, sharpened, lightened, 72 dpi, file size = 97.7kb.
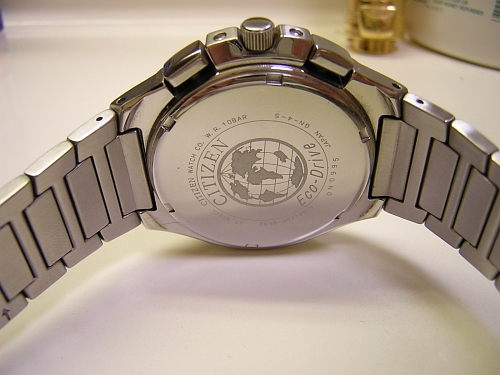
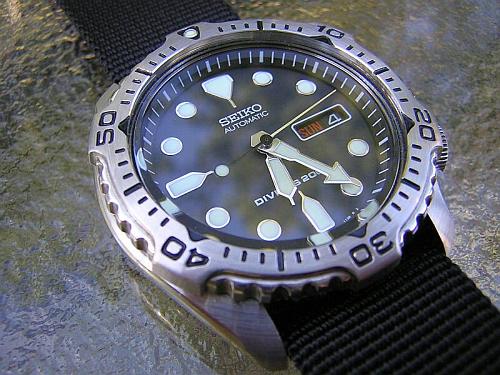
2 mpix, indirect sunlight through skylight in bathroom(!), resized, sharpened, 72 dpi, file size = 135.4kb (saved as jpeg with zero compression to preserve quality).
Last updated 26.June.2011